
To block acrylic yarn effectively, you need a simple yet powerful technique. Fill a spray bottle with lukewarm water and mist your project. Use blocking mats to shape the piece as desired. Pin the acrylic yarn in place, then let it dry completely. Voilà! Your project will hold its shape beautifully. Blocking acrylic yarn doesn’t have to be a daunting task; with these steps, you can achieve professional results effortlessly.

How to Block Acrylic Yarn: A Beginner’s Guide
Welcome to our beginner’s guide on how to block acrylic yarn! If you’ve just finished crafting a beautiful piece using acrylic yarn and want to make it even more polished and professional-looking, blocking is a crucial step. In this article, we will walk you through the process of blocking acrylic yarn, including why it’s important and the various methods you can use. Let’s get started!
What is Blocking and Why is it Important?
Blocking is a process used in knitting and crocheting to shape and set your finished piece. It helps smooth out any uneven stitches, correct the size and shape, and overall enhance the appearance of your project. Acrylic yarn, while durable and easy to care for, can benefit greatly from blocking to give it a more refined look.
Materials You’ll Need
Before we dive into the steps of blocking acrylic yarn, let’s gather the materials you’ll need:
Materials:
- Finished acrylic yarn project
- T-pins or blocking wires
- Blocking mats or towels
- Spray bottle with water or steam iron
- Tape measure
Wet Blocking Method
One common method of blocking acrylic yarn is the wet blocking method. Here’s how you can do it:
Step 1: Prepare Your Project
Gently soak your finished acrylic yarn project in lukewarm water for about 15-20 minutes. You can add a bit of mild detergent if needed. Avoid agitating the project too much to prevent felting.
Step 2: Remove Excess Water
After soaking, gently squeeze out the excess water from your project. Avoid wringing or twisting the yarn, as this can misshape your work. Lay the project on a clean towel and roll it up to absorb more water.
Step 3: Blocking the Project
Pin your project to the blocking mat or towels using T-pins or blocking wires. Start by pinning the edges and then work your way around to shape the project as desired. Use a tape measure to ensure the project is blocked to the correct measurements.
Step 4: Let it Dry
Allow your project to dry completely before unpinning it. This can take anywhere from a few hours to overnight, depending on the thickness of the yarn and the size of the project.
Steam Blocking Method
Another method you can use to block acrylic yarn is the steam blocking method. Here’s how you can do it:
Step 1: Prepare Your Project
Lay your project on a flat surface, ensuring it is in the desired shape and size.
Step 2: Steam the Project
Using a steam iron on a low setting, hover over the project without touching it. Allow the steam to penetrate the fibers without applying direct heat. Move the iron around the project, ensuring all areas are heated evenly.
Step 3: Let it Cool
After steaming, allow your project to cool and dry completely before handling it. This will help set the shape and size of the project.
Finishing Touches
Once your acrylic yarn project is completely dry and blocked, you can remove the pins or wires and admire your handiwork. Blocking not only enhances the appearance of your project but also ensures that it retains its shape and size over time. Whether you prefer wet blocking or steam blocking, the key is to take your time and block with care.
So there you have it—a beginner’s guide on how to block acrylic yarn! We hope this article has been helpful in guiding you through the process of blocking your acrylic yarn projects. Remember, practice makes perfect, so don’t be afraid to experiment and find the blocking method that works best for you. Happy crafting!
Remember, practice makes perfect, so don’t be afraid to experiment and find the blocking method that works best for you. Happy crafting!
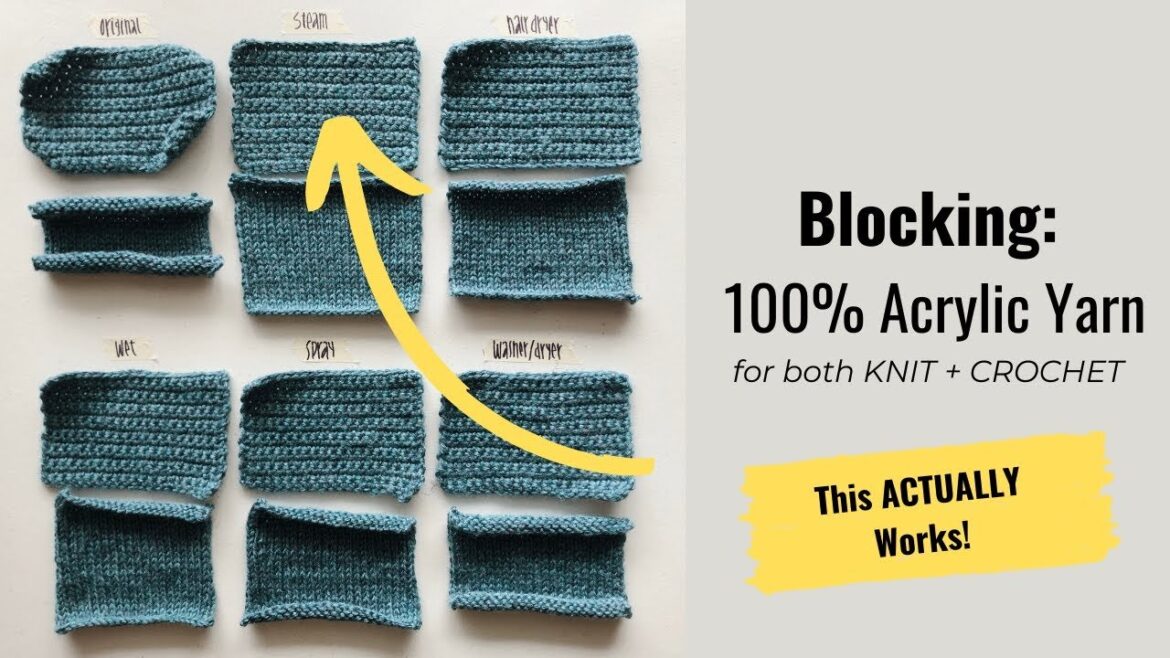
How to Block 100% Acrylic Yarn | The Best Way for Knit + Crochet
Frequently Asked Questions
How can I block acrylic yarn effectively?
To block acrylic yarn, start by soaking the knitted or crocheted piece in lukewarm water with a mild detergent. Gently squeeze out excess water without wringing the item. Lay the piece flat on a blocking mat or towel, shaping it into the desired dimensions. Pin the edges in place and let it air dry completely. You can also use a steam iron on low heat to set the shape if needed.
Is blocking acrylic yarn necessary?
Blocking acrylic yarn can improve the drape, shape, and overall appearance of the finished project. While acrylic yarn doesn’t block as permanently as natural fibers, it can still benefit from blocking to smooth out stitches and enhance the final look of your project.
Can I steam block acrylic yarn?
Yes, you can steam block acrylic yarn. Hold a steam iron several inches away from the acrylic piece and gently steam the fabric without touching it. Once steamed, shape the item to the desired dimensions and let it cool and dry completely. Steam blocking can help set the shape of acrylic yarn effectively.
Final Thoughts
To block acrylic yarn, start by pinning the knitted or crocheted item into shape on a blocking board. Next, steam the item with an iron or steamer, keeping a safe distance to avoid melting the yarn. Allow the item to cool and dry before unpinning. Blocking acrylic yarn enhances the finished look and shape of your project, giving it a more professional and polished appearance. Mastering the technique of how to block acrylic yarn can elevate your crafting skills to the next level.